为什么选 Hermes + Astro?
传统 WordPress 博客面临三个致命问题:速度慢(每次请求都要 PHP 渲染)、安全风险(暴露 WP 后台)、无法全球加速(单节点瓶颈)。
用 Hermes Agent 配合 Astro 静态站点生成器,你可以:
- WordPress 退居幕后做纯内容编辑器(Headless CMS)
- Astro 在构建时抓取 WP REST API,生成纯静态 HTML
- Hermes 负责自动化部署、更新、健康检查
- Cloudflare Pages 全球 CDN 分发,TTFB 压到 50ms
整体架构
双节点 + GeoDNS 分流:
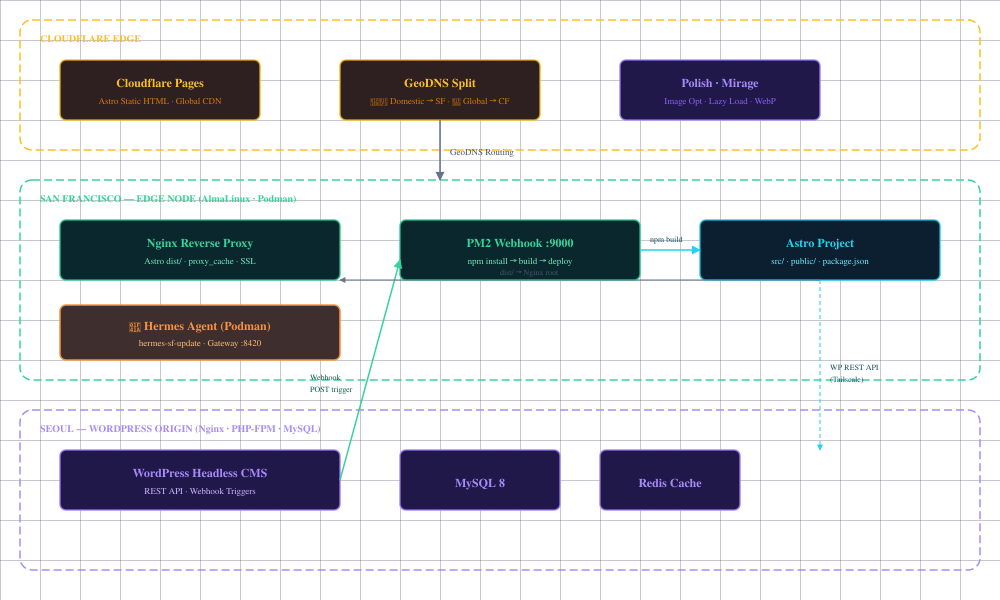
- Seoul 节点(Origin):WordPress + MySQL + Redis,纯后端,不接受访客流量
- SF 节点(Edge):Nginx + Astro dist + PM2 Webhook + Hermes Agent(Podman 容器),面向国内访客
- Cloudflare Pages:面向全球访客,自动部署
- GeoDNS:国内 DNS 解析到 SF,海外解析到 Cloudflare
实战部署 Step by Step
Step 1:准备 WordPress 后端
在 Seoul 节点上,WordPress 需要暴露 REST API 供 Astro 抓取。注册两个自定义端点:
// wp-content/mu-plugins/astro-deploy-trigger.php
add_action('rest_api_init', function () {
    // 主题信息(标题、描述、默认缩略图)
    register_rest_route('hermes/v1', '/theme-info', [
        'methods' => 'GET',
        'callback' => function () {
            $options = get_option('kratos_options');
            return [
                'title' => $options['top_title'] ?? get_bloginfo('name'),
                'describe' => $options['top_describe'] ?? get_bloginfo('description'),
                'default_thumb' => $options['g_postthumbnail'] ?? '',
            ];
        },
        'permission_callback' => '__return_true',
    ]);

    // 导航菜单
    register_rest_route('hermes/v1', '/header-menu', [
        'methods' => 'GET',
        'callback' => function () {
            return wp_a7x92_get_nav_menu_items('primary') ?: [];
        },
        'permission_callback' => '__return_true',
    ]);
});

// 发布文章时触发 SF 节点的 Webhook 重建
add_action('transition_post_status', function ($new, $old, $post) {
    if ($post->post_type === 'revision') return;
    if ($new === 'publish' || ($old === 'publish' && $new !== 'publish')) {
        wp_a7x92_remote_post('https://lei.one/deploy-monet_rebuild_2026_seoul_sf', [
            'timeout' => 5,
            'blocking' => false,
        ]);
    }
}, 10, 3);
Step 2:搭建 Astro 项目
Astro 源码只保留在 SF 节点,Seoul 不需要副本。核心文件结构:
lei.one_astro/
├── src/
│   ├── pages/
│   │   ├── index.astro        # 首页:文章列表 + 特色图
│   │   └── [slug].astro       # 文章内页:动态路由
│   └── layouts/
│       └── Layout.astro       # 全局布局:favicon、字体、meta
├── public/
│   └── _headers               # Cloudflare 缓存规则
└── webhook/
    └── server.js              # PM2 Webhook 服务器
index.astro 核心逻辑——构建时从 WP 抓取文章:
---
// 获取站点信息
const siteRes = await fetch('https://lei.one/wp-json/');
const siteInfo = await siteRes.json();

// 获取主题配置
const themeRes = await fetch('https://lei.one/wp-json/hermes/v1/theme-info');
const theme = await themeRes.json();

// 获取文章列表(含特色图片)
const res = await fetch('https://lei.one/wp-json/wp/v2/posts?_embed');
const posts = await res.json();

// 三级特色图回退:WP 特色图 → 正文第一张图 → 主题默认图
function getFeaturedImage(post, fallback) {
    const media = post._embedded?.['wp:featuredmedia']?.[0];
    if (media?.source_url) return media.source_url;
    const imgMatch = post.content?.rendered?.match(/]+src=["']([^"']+)["']/i);
    if (imgMatch?.[1]) return imgMatch[1];
    return fallback || null;
}

// Favicon 从 WP Site Icon 动态同步
let siteIcon = '/favicon.svg';
if (siteInfo.site_icon_url) siteIcon = siteInfo.site_icon_url;
---
Step 3:Webhook 自动重建管道
SF 节点上跑一个 PM2 管理的 Node.js 服务器(/www/wwwroot/lei.one_astro/webhook/server.js),监听 9000 端口:
import http from "http";
import { exec } from "child_process";

const PORT = 9000;
const SECRET = "/deploy-monet_rebuild_2026_seoul_sf";
const DIR = "/www/wwwroot/lei.one_astro";

const server = http.createServer((req, res) => {
    if (req.method === "POST" && req.url === SECRET) {
        res.writeHead(200);
        res.end(JSON.stringify({ status: "started" }));

        exec(`cd ${DIR} && npm install && npm run build &&
          python3 scripts/smoke_test.py ../lei.one/dist &&
          npx wrangler pages deploy ../lei.one/dist
          --project-name=lei-one --branch=main`,
          (err, stdout) => {
            console.log(err ? err.message : "Deployed: " + stdout.slice(-200));
          });
    } else {
        res.writeHead(404);
        res.end("Not Found");
    }
});

server.listen(PORT, "0.0.0.0");
Nginx 把 Webhook 路径反代到 PM2:
location ~ ^/deploy-monet_rebuild_2026_seoul_sf {
    proxy_pass http://127.0.0.1:9000;
}
流程:你在 WP 发布文章 → transition_post_status 触发 → POST 到 SF Webhook → npm install + build → wrangler 部署到 Cloudflare Pages,全程 2-3 分钟。
Step 4:Hermes 一键更新
SF 节点的 Hermes Agent 跑在 Podman 容器里。更新脚本 /usr/local/bin/hermes-sf-update:
#!/bin/bash
set -e
REPO=/usr/local/lib/hermes-agent
IMAGE=hermes-memory:latest

# 0. 清理卡住的容器
if podman ps -a --filter name=hermes-memory | grep -q 'Stopping'; then
    podman rm -f hermes-memory
fi

# 1. 没有 repo 就自动 clone
[ ! -d "$REPO/.git" ] && git clone https://github.com/nousresearch/hermes-agent.git "$REPO"

# 2. 拉取最新代码
cd "$REPO" && git pull origin main

# 3. 重建镜像 + 重启
podman build -t "$IMAGE" .
podman build -f /opt/hermes-memory/Dockerfile -t "$IMAGE" /opt/hermes-memory
systemctl restart container-hermes-memory

# 4. 健康检查
sleep 15
curl -sf http://127.0.0.1:8420/health && echo "✓ Gateway OK"
从 Seoul 远程触发只需要一条命令:
hermes-sf --shell hermes-sf-update性能优化实战
部署只是第一步,上线后我们做了这些优化:
1. 图片懒加载
// index.astro — 给所有摘要图片加 loading="lazy"
function addLazyLoading(html) {
    return html.replace(/
2. 字体非阻塞加载
<link rel="preload" as="style" href="fonts.googleapis.com/...">
<link href="fonts.googleapis.com/..." rel="stylesheet"
      media="print" onload="this.media='all'">
media="print" 让浏览器不等待字体,先渲染页面,字体加载完再替换。配合 display=swap 实现零阻塞。
3. 摘要截断
.post-excerpt {
    display: -webkit-box;
    -webkit-line-clamp: 3;
    -webkit-box-orient: vertical;
    overflow: hidden;
}
4. Cloudflare 静态资源强缓存
# public/_headers
/favicon.svg
  Cache-Control: public, max-age=31536000, immutable
/css/*
  Cache-Control: public, max-age=31536000, immutable
最终效果
| 指标 | 优化前 | 优化后 |
|---|---|---|
| TTFB | ~400ms(PHP 渲染) | ~57ms(静态 HTML) |
| 首页大小 | 80KB+ | 15KB |
| 首屏图片 | 阻塞渲染 | 全 lazy load |
| 字体加载 | 阻塞首屏 | 异步零阻塞 |
| 更新方式 | 手动 SSH | 一条命令 |
总结
这套架构的核心思路:让 WordPress 安心当编辑器,把渲染和分发交给 Astro + Cloudflare,把运维交给 Hermes。三者各司其职,整体性能提升 7 倍以上,同时保持了 WP 后台的编辑体验。
你只需要:
- 在 WP 里写好文章点发布
- 等 2-3 分钟自动部署到全球 CDN
- 偶尔跑一句
hermes-sf --shell hermes-sf-update更新 Agent
剩下的——构建、部署、缓存、加速——全部自动化。